Installation manual
F.A.Q.
How to use integrations?
Roomonitor offers you the possibility that when our system detects a noisy situation inside the apartment, the first notification goes directly to the guest staying in your apartment. This way we will resolve most noise incidents without you having to do anything, our system will do it for you.
How does automatic guest notification work?
The first alarm will be sent to the guest through a phone call informing them that noise complaints have been received from their apartment and asking them to lower the volume. We will send you an SMS and/or an email. If the guest does not react to the warning within 30 minutes, the alarm will be activated again and if a noisy situation is detected again, we will only notify you through a call, SMS and/or email. This way you will know that they have already received the first notice and that the noise has not stopped, so you should contact them to explain the apartment's coexistence rules.
How can I start using it?
Next
- If you are a user of Next Now you can take advantage of the integration we have prepared to help you control noise in your properties effortlessly.
Thanks to the collaboration between Avantio and Roomonitor, the process is very simple, we explain it below:
- The first thing you have to do is ask the Avantio Support Team for API access credentials through support.avantio.com. They will provide you with the API Username and Password.
- When you have this data you have to access panel.roomonitor.com with the access data that Roomonitor has provided you.
- From the dashboard you have to click on your username (upper right corner) and in the drop-down menu click on "Integrations".
- Select the Avantio option. Once inside, it will ask you for the API user and Password that the Avantio Support Team has provided you. When you have entered them, click on "Save credentials".
- If the data is correct you will see a new menu appear. It is time to link the Roomonitor that you have installed with the properties that you have uploaded in Avantio.
- In the first drop-down menu a list will appear with all the Roomonitor that you have installed in your apartments, select the one you want to link.
- In the second drop-down menu you will see a list with all the properties that you have uploaded in Avantio, select the corresponding one and click on "Link rooms"
- Repeat the process with all the properties where you have Roomonitor installed.
Once you have everything linked you can decide in which property you activate this function and you can also change it whenever you want. To do this you have to follow the following steps:
- From the panel.roomonitor.com dashboard click on "Active Monitors"
- Access the device for which you want to activate or deactivate the service.
- At the top right click on "Settings"
- You will see a series of options, including "Notify the guest before hand in case of noise", if you want us to notify your guest in case of noise alarm you should activate this option on each device that you have integrated with Avantio.
Of course if you have any questions you can send us a ticket and we will help you as quickly as possible!
Icnea
- If you are a user of Icnea Now you can take advantage of the integration we have prepared to help you control noise in your properties effortlessly.
Thanks to the collaboration between Icnea and Roomonitor, the process is very simple, we explain it to you below:
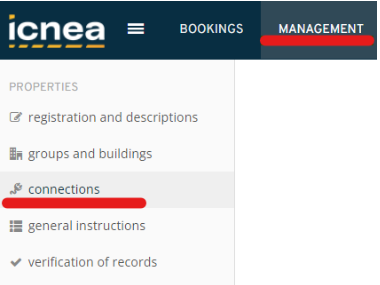
- Access with your general manager user on the Icnea website
- Enter the MANAGEMENT section and then connections
- Once there you will only see the active integrations, so you must click on the “ADD connections” button and look for the ROOMONITOR logo.
- Now you must log in and enter your Roomonitor user credentials (the same ones you use to monitor your apartments).
Zapier
Guesty
Copy Guesty API Key
Step by step:
- Sign in to your Guesty account.
- In the top navigation bar, click the icon drop-down menu and select Settings Mode.
- Click Integrations, then select Marketplace.
- On the Roomonitor thumbnail, click Connect.
- In the upper right corner, click Connect.
- Click the API key to copy it.
- Click OK.
Conectar Roomonitor con Guesty
Step by step:
- Log in to your Roomonitor account.
- Click Support.
- Click Integrations.
- Click Guesty.
- Click Save.
- Paste the API key.
If you need further assistance, please contact Roomonitor by email: support@roomonitor.com.
How do I install my NoiseAlarm device?
Step 1
Preparation and Location
Once you have opened the package, before proceeding, consider the following tips to choose the ideal location:
- Opt for an area where guests tend to congregate, such as the living room.
- Avoid proximity to noise sources, such as televisions or appliances.
- Do not cover it, to ensure maximum effectiveness of its sensors.
- Make sure there is WiFi network coverage.
- Locate a nearby electrical outlet, remembering that the battery serves as a backup in case of tampering.
Step 2
Device Fixation
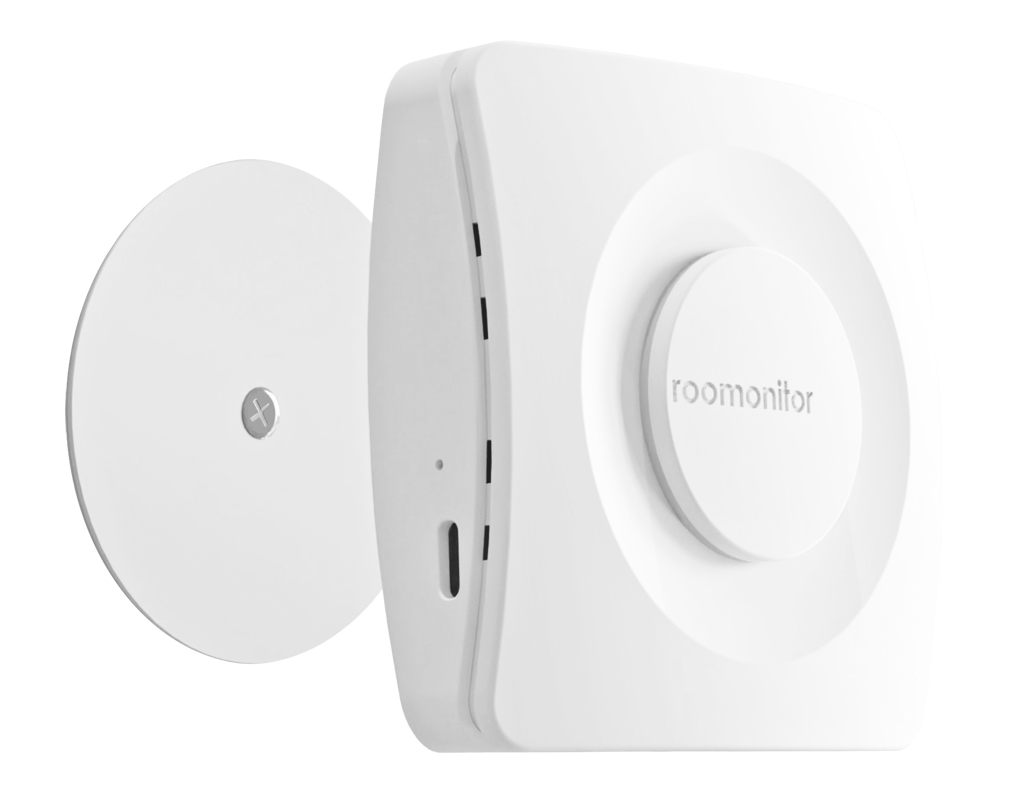
Decide whether to use the sticker or screw the metal plate into the selected location. The second option is preferable on rough surfaces for greater fixation.
Step 3
Device Connection
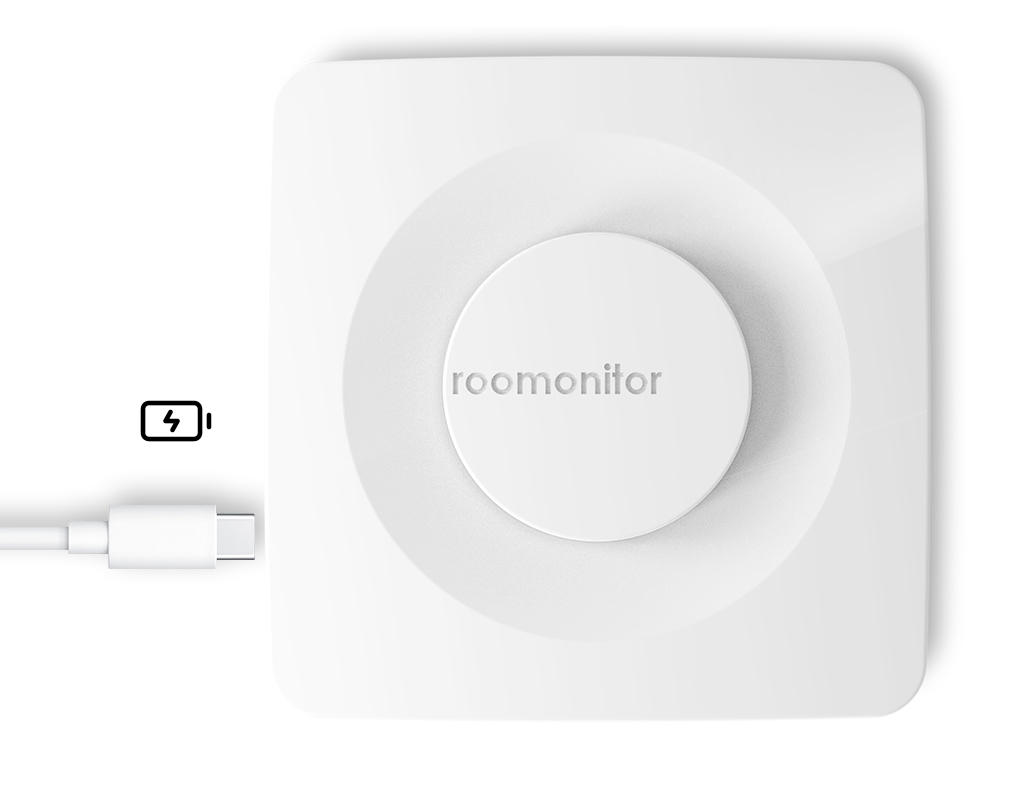
With the board in place, connect the charger and plug the USB-C cable into the device.
Step 4
Settings Home
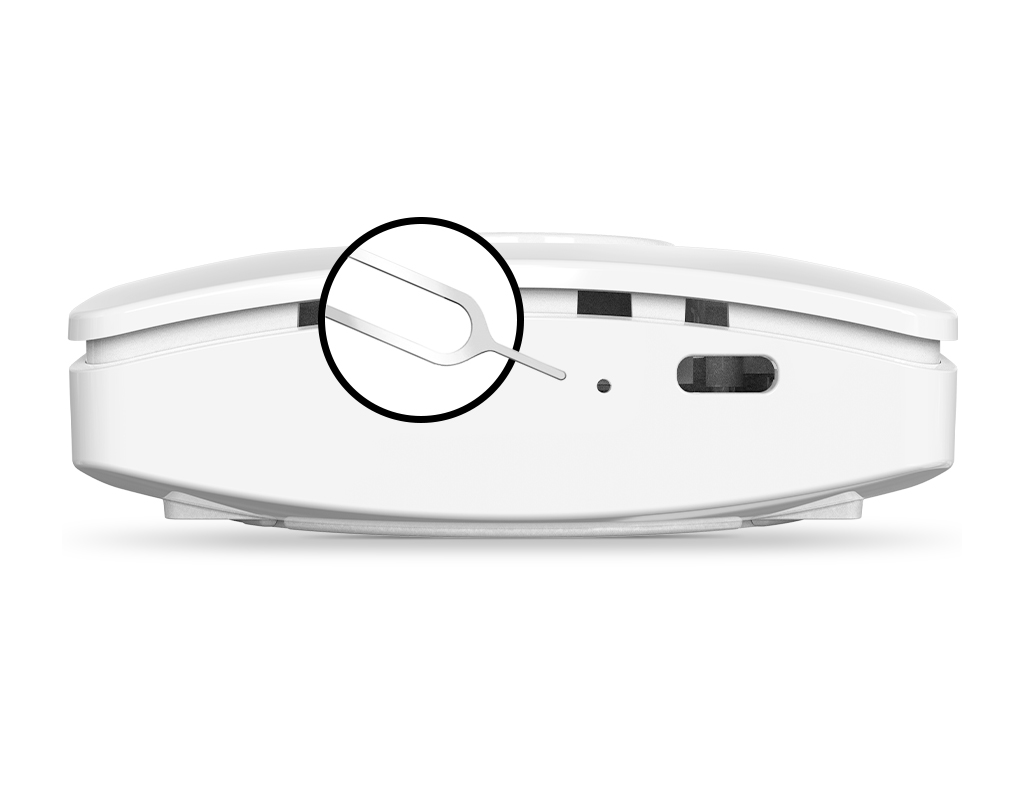
Once installed and plugged in, right next to the USB connector, you will see a small hole, with an object that fits inside (a paper clip for example) you have to press the inside button 3 times and leave it pressed the third time until the lights turn off, once there you can stop clicking. After a few seconds you will see a flashing blue light, indicating that the device is in configuration mode.
Step 5
Download the App and log in
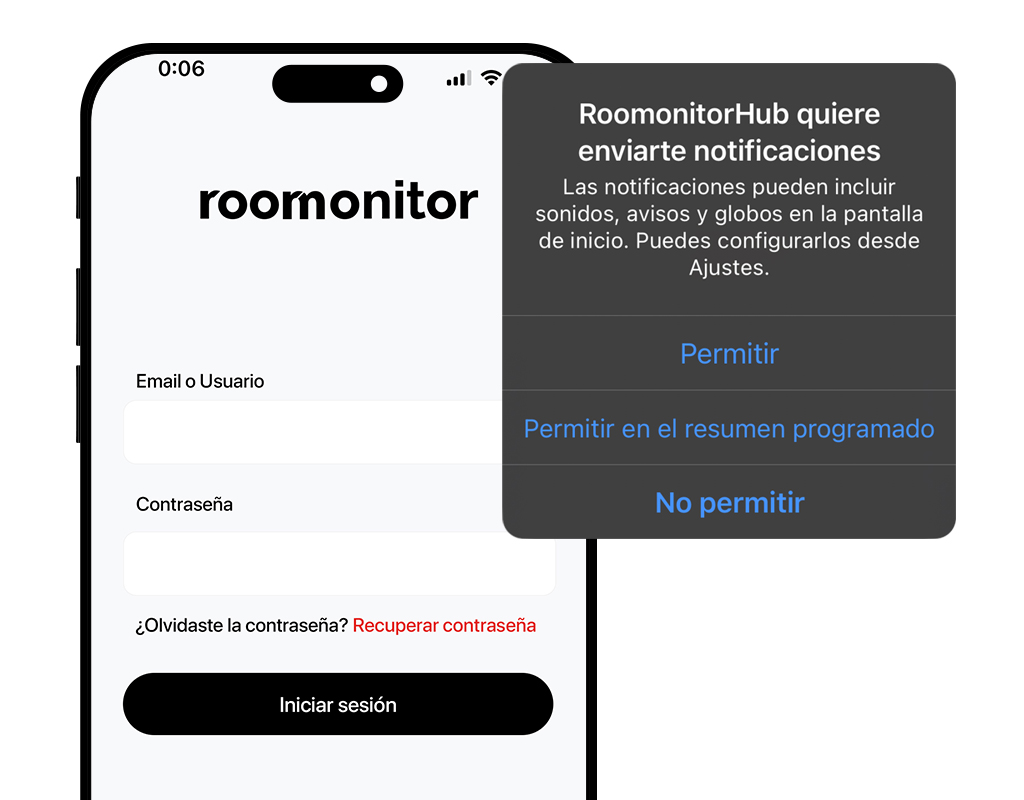
When you open the application, enter the access data previously provided by email. Don't forget to enable App notifications.
Download iOS or Android App:
Step 6
Device Configuration
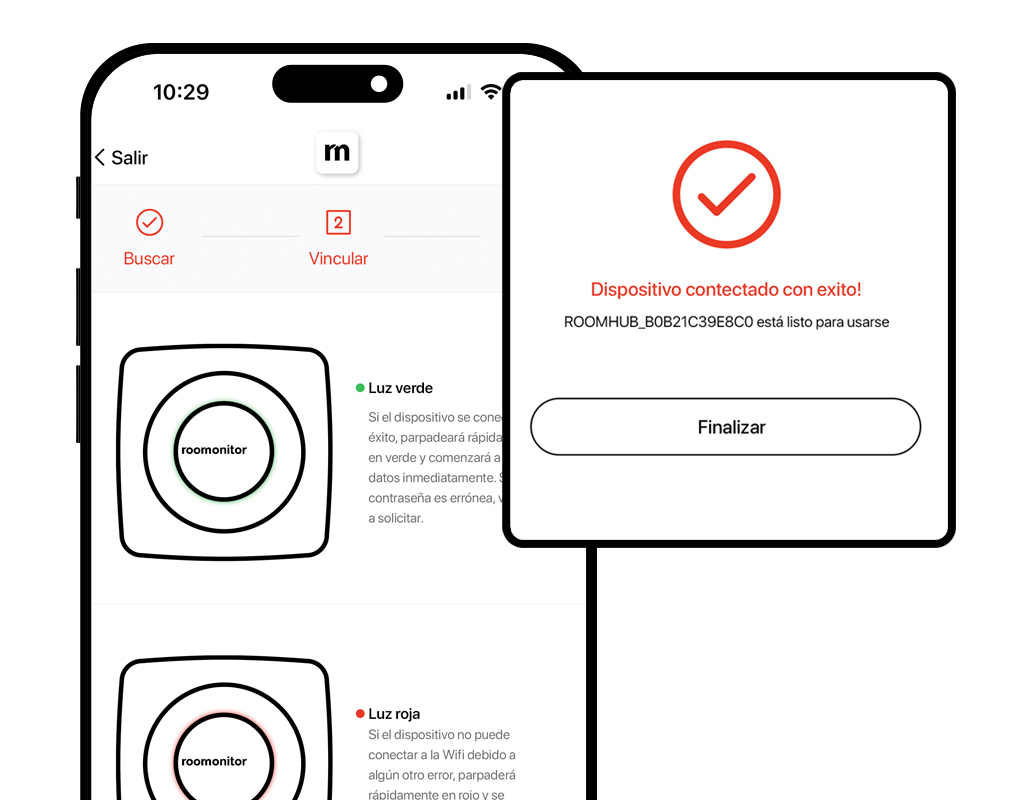
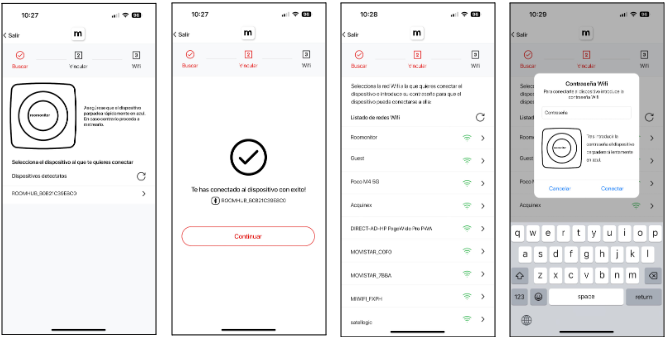
Select new device - Accept the use of Bluetooth - Select the Wi-Fi network - Enter the password
Step 7
Verification and Completion
If everything has been set up correctly, the device will flash green. Flashing red indicates a problem and will require repeating the process. The application will give you the option to finish the process.
Step 8
Data Personalization
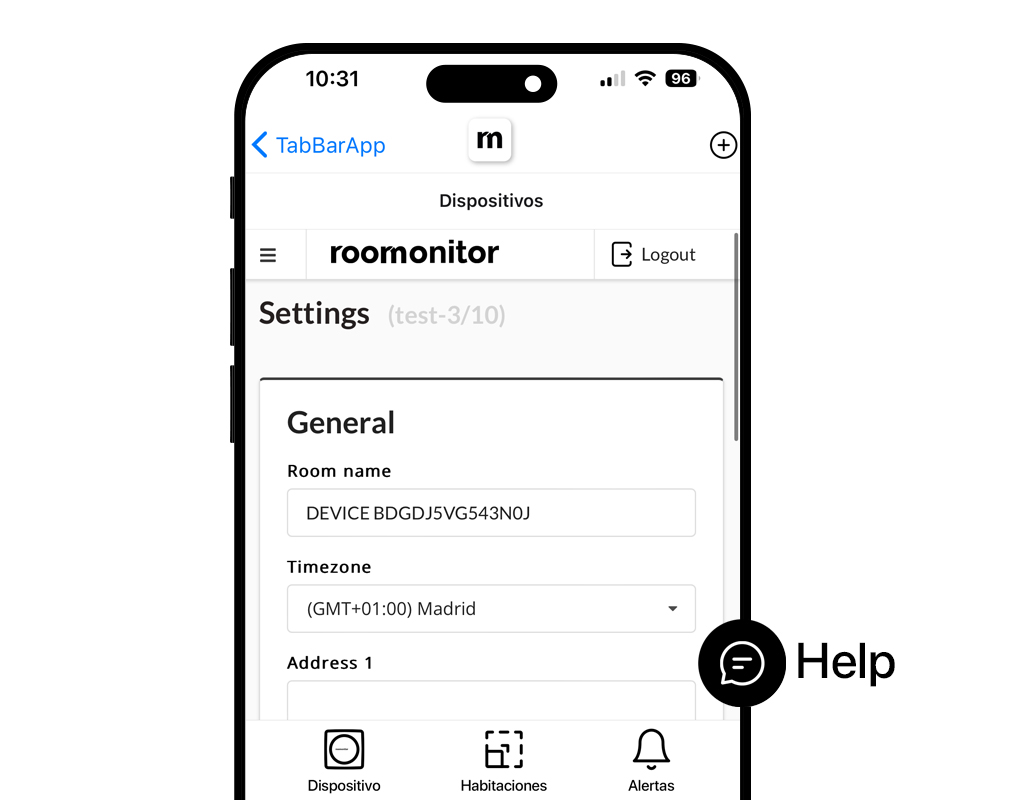
The app will take you to the edit screen where you can modify all the room details such as name, address and phone numbers to receive alerts.
Step 9
Explore the Records
Congratulations! You have completed the installation and configuration of Roomonitor. We are sure that our device will be of great help to both you and your guests.
You can review the records both from the PC application or from any device with your Roomonitor account.
How do I change the sensitivity of my device?
In a normal situation, the sensitivity of your NoiseAlarm device should be at Normal or 3 level (depending on the device you have), however, there are times when it may be better to raise or lower it.
An annoying noise for the neighbors does not have to be a very loud noise in the apartment, there are buildings that, due to their structure and construction materials, make it very easy for the slightest noise to pass to the adjacent floor, creating discomfort for the neighbors. . If on any occasion you receive a complaint from a neighbor and our device has not alerted you, don't worry, increase the sensitivity to Restrictive or 4. The same thing mentioned above will probably happen. This way you will find out much sooner when any disturbance is occurring to the neighbors.
Another case may be that you have the device installed in a house and that you can be more permissive with the noise that your guests make since they are either far from the house or the separating walls are thick. In this type of case you can lower the sensitivity to the permissive level or 2. In this way the noise alarm will need a much higher noise to be activated.
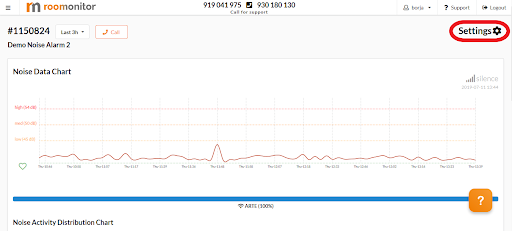
To change the sensitivity of your NoiseAlarm device you have to access with your username and password. www.panel.roomonitor.com, once there you have to go to “active monitors”. Click on the room in which you want to modify the sensitivity. In this new window at the top right we have the “Settings” section (marked in red in the image).
Once inside, in the “Noise” section you have the scale called “Noise Alert Sensitivity” (see image below). Remember that on the scale the levels in order of sensitivity are as follows:
- Battery saving and outdoor
- This configuration is designed for outdoors where there is already constant noise, making it the most permissive of all
- Permissive
- Normal
- Restrictive
- Custom
I have changed router / WiFi / Password
If you have changed your router, it is most likely that the name of your WiFi network and its password have also changed, therefore if you enter the Roomonitor Panel, your Noise Alarm device will appear disconnected.
If you have your Noise Alarm in sight you will also see that it flashes constantly red, this indicates that it is trying to connect to a Wi-Fi network but cannot find it.
To reconnect, all we have to do is reconfigure our Noise Alarm. Follow the following steps:
- Once installed and plugged in, right next to the USB connector, you will see a small hole.
- With an object that fits inside (a paper clip for example) you have to press the inside button 3 times and leave it pressed the third time until the lights turn off, once there you can stop pressing.
- After a few seconds you will see a flashing blue light, indicating that the device is in configuration mode.
- Configure:Enter the app with your credentials and click on the “+” symbol (top right)
- Select the device again
- Accept the use of Bluetooth
- Select the Wi-Fi network
- Enter the password
- If the connection is successful, the device will flash green quickly and a success message will be displayed in the app!
How do I change my Noise Alarm data?
If you have already configured your device, you will most likely want to enter your data to ensure that the alarms reach you correctly when there is more noise than should be in the apartment.
It's very simple, you simply have to access the panel with your username and password, follow this link:
Once there you will be in the dashboard, you have to go to the "Rooms" section. You will see that a list appears with all the devices that you have assigned.
In each row the following information appears:
- Name
- Monitor ID
- Firmware
- Status
- Wifi
- Edit icon.
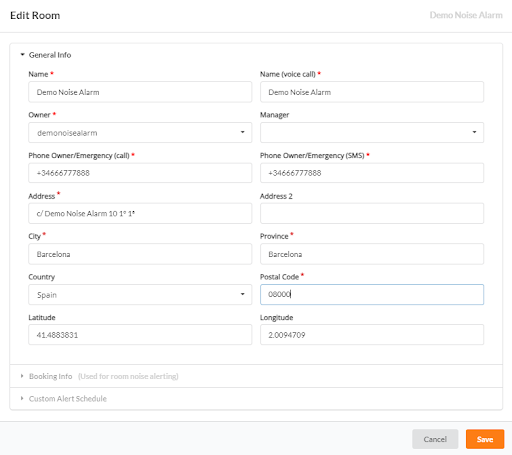
If we click on the edit icon (the one with the pencil drawing), a new screen will open in which we can edit all the data:
Here I tell you what each field is for:
- Name: It is the name that you will see inside the panel, the normal thing is to put the name that you give to the apartment so that you can easily identify it.
- Name (voice call): It is the name that you will hear when you receive the call and SMS from Roomonitor at the moment the noise alarm goes off. It is important that you be clear and that it is not too long so that it is easier for you to identify what apartment is the incidence.
- Phone Owner/Emergency (call): Here you have to enter the phone number where you want to receive the call in case of a noise alarm. It is very important that you put the prefix of the country where the phone is from after the "+", for example for Spain it would be +34.
- Phone Owner/Emergency (SMS): Here you have to enter the phone number where you want to receive the SMS in case of noise alarm. It is very important that you put the prefix of the country where the phone is from after the "+", for example for Spain it would be +34.
- Address: It is the field dedicated to the address of the apartment.
- Lattitude / Longitude: Here you can put the coordinates of the apartment so that it is located well on the Dashboard map.
When you have finished editing the data you have to click on the orange button that says "Save".
Remember that all fields with a * They are required to be able to save and finish editing data.
This would be enough to have your Noise Alarm device ready, if you do not configure this data correctly we will not be able to notify you when there is more noise than necessary in the apartment.
If you have several devices installed you will have to do it on each of them.
My Noise Alarm does not appear connected in the Panel.
If you do not see your connected device in the Dashboard or you have stopped seeing your Noise Alarm in the daily report, you should check that:
- You have not made any changes to the apartment's Wi-Fi network.
- The router is connected and allows you to browse the internet with your computer.
- Our Noisealarm device is connected to the mains.
- The device has not been manipulated by cleaning staff or a client.
If you have reviewed the above and the device still does not connect, most problems are solved by restarting the devices in the apartment, first you have to restart the router and then our device, in both cases it is as easy as disconnecting them from the electrical network and connecting them again. new. In a few minutes you should see your connected devices in the Roomonitor Dashboard.
What do the lights emitted by the device mean?
The device gives us information with each light it emits, whether it is a sequence of lights or a color that flashes so we can know what state it is in.
- Sequences:
- Red->green->blue: On
- Blue->green->red: Off
- Flashing light:
- Blue Flashing fast (1/2 second ON, 1/2 second OFF): Waiting for wifi configuration
- Blue Slow flashing (1 second ON, 1 second OFF): Trying to connect to the configured Wi-Fi
- Green flashing: Wifi connected correctly
- Red flickering: Error connecting Wi-Fi
- Blinking white: Erasing memory (factory reset)
With this information we can identify the state of the device and be able to solve (if necessary) the connection problem with the most appropriate solution.
The solutions to the different problems that you may encounter are the following:
- Blue flashing fast
- The device is in configuration mode, enter the app with your credentials and start the configuration process.
- Blue flashing slow
- The device already has a network configured and is trying to connect to it, if you have made any changes to the network or have moved the device to a further location and it finally does not connect:
- You may need a repeater to properly reach the new location.
- That you need to configure the device because of the WIFI change.
- Return to the initial location (or within WIFI range) to reconnect the device.
- The device already has a network configured and is trying to connect to it, if you have made any changes to the network or have moved the device to a further location and it finally does not connect:
- Red flickering
- The device cannot connect to the configured network
- internet crash
- Restore the Wi-Fi connection and it will auto connect again and if not, you can restart the device
- Change of credentials
- If there has been a change of credentials, a device reconfiguration will be necessary
- internet crash
- The device cannot connect to the configured network
- White flashing
- The device is resetting
How do I reset my device?
If the device is giving you a connection problem due to a power failure and the battery has finally run out, you have different types of combinations to reset it.
- Turn off the device:
- Press the button 5 times in less than 4 seconds
- Reboot:
- Press the button 3 times in less than 4 seconds
- Factory Reset:
- In less than 4 seconds you must press the button 3 times and leave it pressed the last time (for 5 seconds)
- Hard Reset:
- Turn off the device and disconnect the battery
Can I use the device on battery power only?
Our device is designed and prepared to always be used connected to an electricity outlet, it has a backup battery to prevent data loss in case it is disconnected from the outlet for some reason and you can continue monitoring the apartment without problem.
When the device suffers a disconnection and for a period of around 20 minutes and has not been reconnected, the device will send an email (if it has the disconnection notification activated) to notify of the disconnection, this does not mean that the device will not continue working Only it has been disconnected so once the battery runs out if it has not been reconnected it will stop working.
The battery lasts a maximum of approximately 2 months (depending on use and device configuration)
With normal use with standard settings the battery can last about 2 days
